Physical Address
304 North Cardinal St.
Dorchester Center, MA 02124
In this post, we’ll take a practical look at configuring Terraform in a multi-account scenario. If you want to optimize your cloud infrastructure through multiple accounts, this guide is for you. We’ll uncomplicate the process and provide you with the essential steps for an efficient configuration, so that authentication via Terraform AWS SSO is easy and transparent.
Table of contents
AWS Single Sign-On (SSO) is an Amazon Web Services service that simplifies access management for multiple accounts and applications. It allows users to access multiple AWS resources and business applications with a single set of credentials, eliminating the need to memorize multiple passwords. This not only improves the user experience but also strengthens security by centralizing access control.
AWS SSO integrates seamlessly with AWS Organizations, making it easy to administer permissions on a large scale. It supports identity federation with external providers, such as Microsoft Active Directory, and is compatible with standards such as SAML 2.0. In this way, AWS SSO provides a comprehensive solution for companies looking to optimize their authentication and authorization processes with terraform aws sso provider, while maintaining a high level of security and compliance.
Single Sign-On (SSO) authentication in Terraform brings numerous benefits to infrastructure management as code. Firstly, SSO allows users to access various platforms and services with a single set of credentials, simplifying the login process and improving the user experience.
Managing multiple accounts in AWS with Terraform and assume_role offers many benefits including greater security, organization, and control over resources. Using multiple accounts allows you to isolate development, test, and production environments, reducing the risk of accidental interference and improving overall security. Each account can have personalized access policies, ensuring only authorized users and services can access specific resources. In addition, account segmentation makes tracking and managing costs easier, providing a clear view of the expenses associated with each project or team.
Configuring and using assume_role with Terraform aws sso provider simplifies the management of multiple accounts by allowing a single set of credentials to assume different roles in several accounts. This centralizes authentication and facilitates the automation of resource provisioning. Using assume_role, it is possible to reuse Terraform modules and configurations, ensuring consistency and compliance across all accounts. This approach reduces operational complexity, minimizes human error, and allows for more efficient infrastructure management.
Scroll to the target account
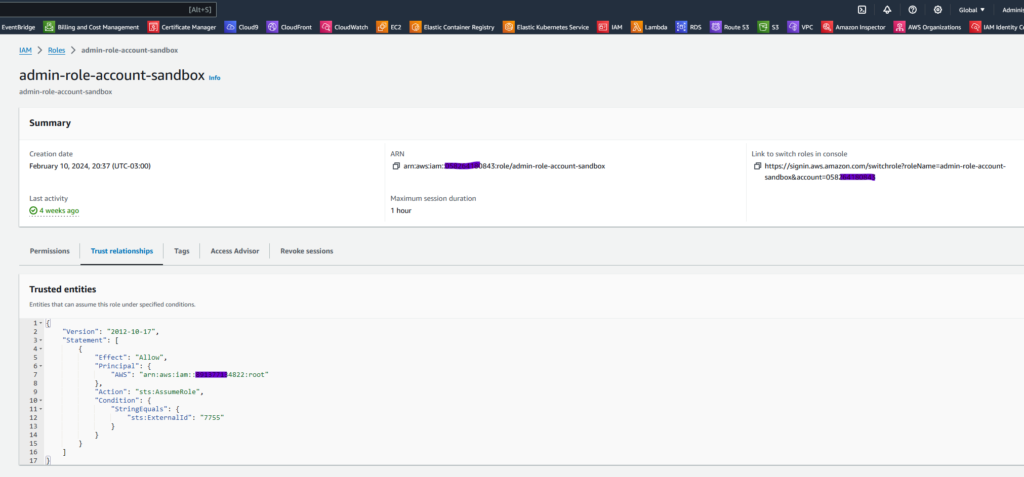
Considering that we have a target account, where there is a role that we want to assume the roles of, from the user of the source account, we need to ensure the configuration of the Trusted entities in the desired role.
Here is the code that was used in my example. It defines the conditions under which an entity can assume a certain role in AWS:
{
    "Version": "2012-10-17",
    "Statement": [
        {
            "Effect": "Allow",
            "Principal": {
                "AWS": "arn:aws:iam::891377134822:root"
            },
            "Action": "sts:AssumeRole",
            "Condition": {
                "StringEquals": {
                    "sts:ExternalId": "7755"
                }
            }
        }
    ]
}“Principal“: Defines who or what can take on the role. In this case, it’s the AWS account with the ARN arn:aws:iam::891377134822:root.
“Action“: “sts:AssumeRole“: Specifies the action that is being allowed, which is sts:AssumeRole. This allows the main entity to assume the role.
“Condition“: Defines additional conditions that must be met for the action to be allowed.
StringEquals“: This is a condition operator that checks whether the value of a specific attribute is equal to the value provided."sts:ExternalId":"7755": This condition checks that the ExternalId used when trying to assume the role is equal to 7755. The ExternalId is a security measure that can be used to ensure that only specific entities can assume the role.Expected result:

# terraform aws sso provider
provider "aws" {
  region = var.region

  profile = "devopsmind-labs/AdministratorAccess"

  assume_role {
    role_arn     = var.role_arn
    external_id  = "7755"
    session_name = "terraform-session"
  }
}
In this example, we configure the AWS provider to use assume_role, specifying the required role_arn and session_name.
In this example, the external_id has also been configured, which is optional, but is an additional security feature.
Explaining a little more about the main fields:
profile = "devopsmind-labs/AdministratorAccess": Specifies the AWS profile to be used, which must be configured in the AWS credentials file (~/.aws/credentials) or in the AWS config file (~/.aws/config).assume_role allows Terraform to assume a specific role in AWS.role_arn = var.role_arn: Defines the ARN of the role to be assumed, based on the variable role_arn defined in variables.tf.external_id = "7755": Defines an external ID for the assumed role session, which can be used for additional security.session_name = "terraform-session": Defines the session name for the assumed role.# Find the user currently in use by AWS
data "aws_caller_identity" "current" {}
# Region to deploy the solution to
data "aws_region" "current" {}
# Availability Zones to use in our solution
data "aws_availability_zones" "available" {}The data.tf file defines the data needed to obtain the current user’s identity, region and availability zones.
variable "region" {
  description = "The AWS region to create the resources in"
  type        = string
  default     = "us-east-1"
}

variable "role_arn" {
  description = "The ARN of the role to assume"
  type        = string
  default = "arn:aws:iam::058264174146:role/admin-role-account-sandbox"
}
The variables.tf file declares the role_arn variable, containing the ARN of the IAM role/role that Terraform should assume.
In the main.tf file, we’ll define the resource we want to create, which in this case is a simple S3 bucket:
resource "aws_s3_bucket" "this" {
  bucket         = "meu-bucket-devops-mind"

  tags = {
    Name        = "meu-bucket-devops-mind"
    Environment = "Dev"
  }
}To use a single user to authenticate multiple accounts, in the Terraform manifest the profile = "devopsmind-labs/AdministratorAccess" was entered, as this is a centralized user in our example.
The expected configuration of ~/.aws/config is something similar to the example below:
cat ~/.aws/config
[default]
region = us-east-1
output = json

[profile fernandomuller]
region = us-east-1
output = json

[profile devopsmind-labs/AdministratorAccess]
granted_sso_start_url      = https://d-9022f718d0.awsapps.com/start/
granted_sso_region         = us-east-1
granted_sso_account_id     = 891377134822
granted_sso_role_name      = AdministratorAccess
common_fate_generated_from = aws-sso
credential_process         = granted credential-process --profile devopsmind-labs/AdministratorAccess
Note:
In my environment I use the Granted service to facilitate the process of creating the configuration and authenticating to AWS itself.
In this article below I go into more detail about how important Granted is, by helping access cloud functions and allowing multiple cloud accounts to be opened in your web browser simultaneously and/or via terminal, greatly simplifying AWS SSO Login:
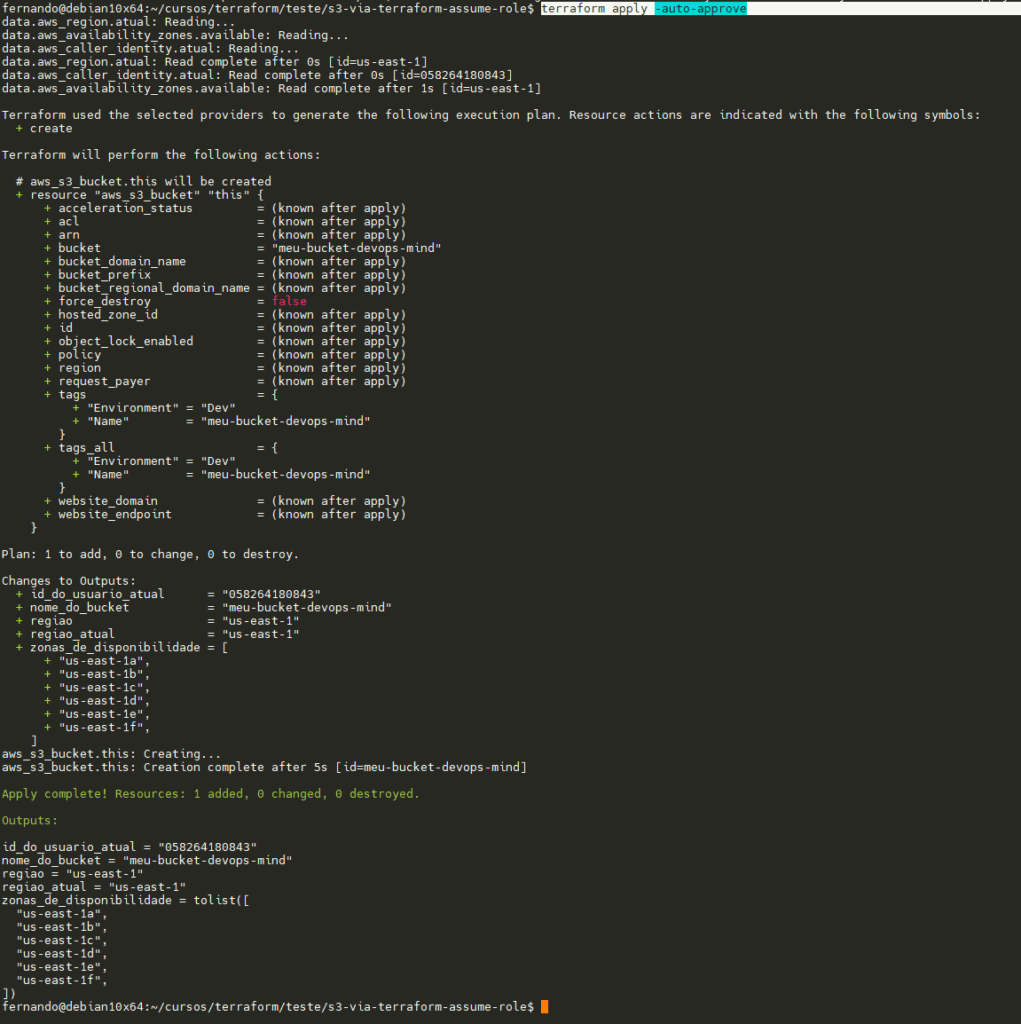
Accessing the directory where I have configured the Terraform manifests, I will apply them and validate that authentication is as expected:
terraform apply -auto-approve

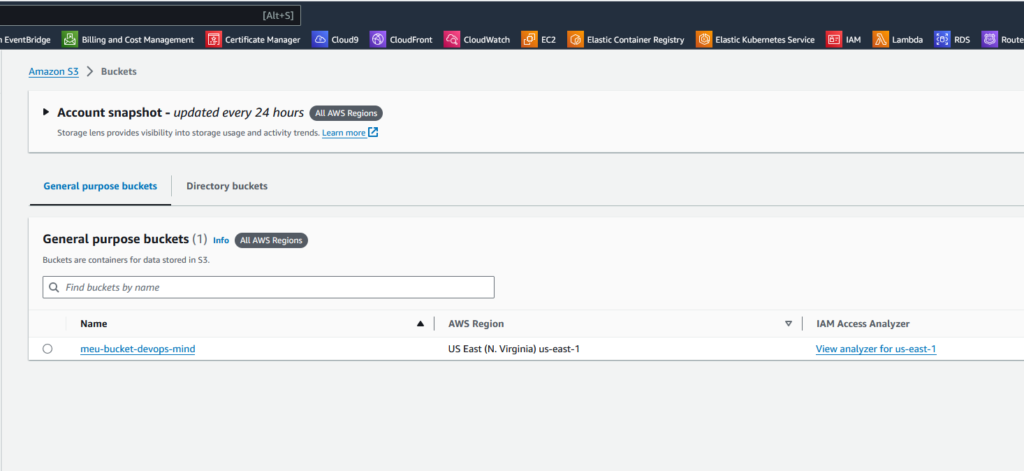
Bucket successfully created:
