Physical Address
304 North Cardinal St.
Dorchester Center, MA 02124
This week I needed to enable ALB logs on AWS, to troubleshoot an incident, so I forwarded the access logs to S3.
The main benefit of enabling ALB logs is the ability to troubleshoot and identify performance bottlenecks. By analyzing the logs, you can detect traffic patterns, identify errors and anomalies, and take corrective measures to improve application efficiency.

In addition, ALB logs are also valuable for compliance and security purposes. They record information such as IP addresses, URLs accessed, and HTTP status codes, which can be crucial for investigating suspicious activity, identifying potential attacks, and performing compliance audits.
However, it’s important to keep in mind that storing logs can come at a significant cost, especially in high-demand or request-heavy environments. Logs can take up considerable space on your data storage, which may incur additional charges.
To mitigate the costs associated with ALB logs, it is recommended that you implement an efficient management strategy. This can include setting up retention policies to limit the amount of time logs are stored, using log compression to reduce file sizes, and using data analysis services to process and filter logs more efficient.
It is also important to consider properly configuring access permissions to ALB logs. Ensuring that only relevant teams and individuals have access to logs can help prevent sensitive information leaks and minimize security risks.
In summary, enabling ALB logs on AWS is critical for monitoring and analyzing network traffic and ensuring proper application performance and security. However, it is important to be aware of the costs associated with storing logs and adopt efficient management practices to optimize usage and minimize unnecessary expenses.
As many know, the costs to store a massive amount of logs in S3 is enormous, so I decided to activate the lifecycle of S3 itself, specifying a specific path (where the ALB logs are) for it to delete logs older than 2 days.
However, 2 days passed and the objects were still in the bucket, generating unnecessary costs.
In another bucket, where I enabled lifecycle for the entire bucket, the process was proceeding as expected.

Since the solution offered by AWS was not working as expected, I decided to take another approach, creating a Python script that performs this lifecycle process.
To create a structure where the lifecycle process occurs in an automated way, similar to what I would achieve through the S3 configuration, it was necessary:
The first step is to access the AWS console and go to the Lambda service.
Within Lambda, access:
In the window that will open, leave the option Author from scratch checked, in Function name I put “s3-lifecycle” (you can choose the name you think is most appropriate) and in Runtime choose “Python 3.9”.
Here is an example image:
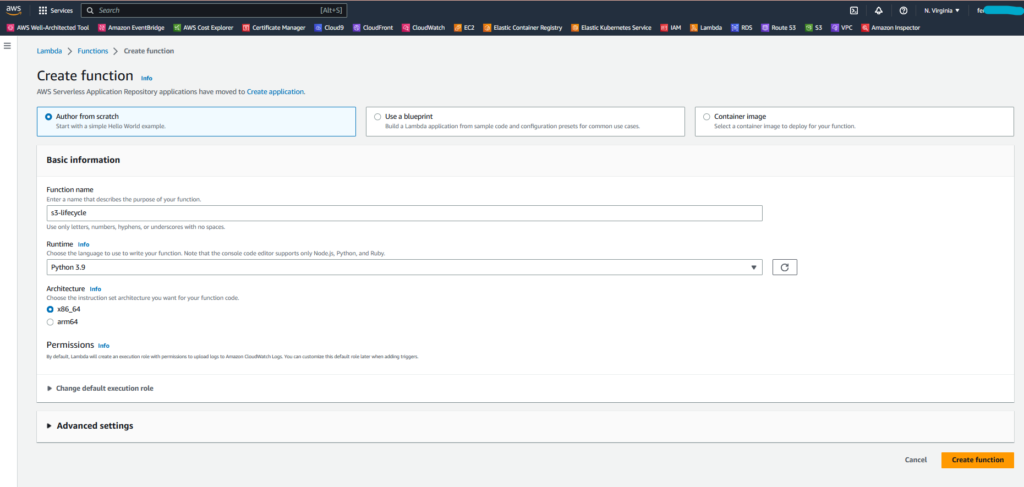
The rest leave as is, click on Create function.
A screen like this will be shown:
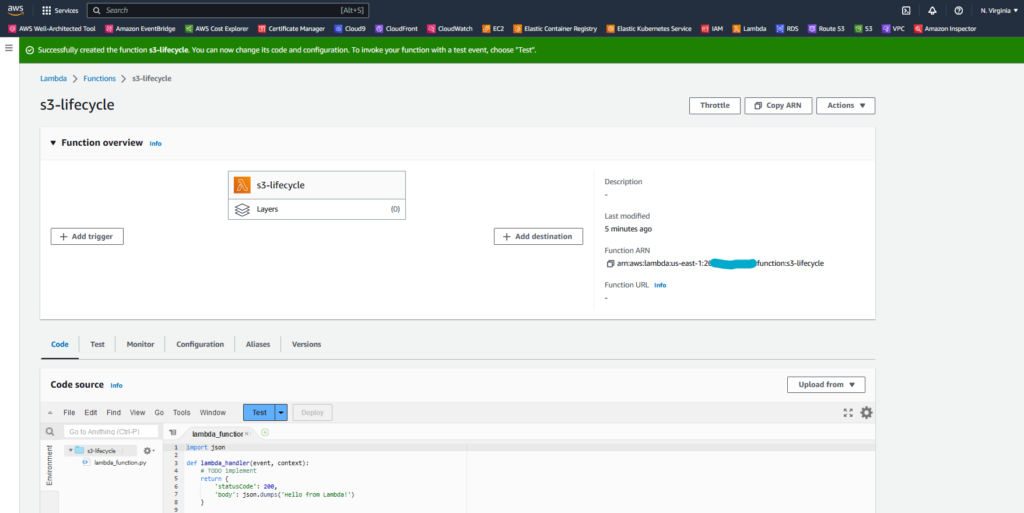
In the snippet with example code in Python, let’s remove the lines and add our code:
import boto3
from datetime import datetime, timedelta, timezone

def delete_objects(bucket_name, prefix, days):
    s3 = boto3.client('s3')
    cutoff_date = datetime.now(timezone.utc) - timedelta(days=days)

    objects_to_delete = []

    paginator = s3.get_paginator('list_objects_v2')
    page_iterator = paginator.paginate(Bucket=bucket_name, Prefix=prefix)

    for page in page_iterator:
        if 'Contents' in page:
            for obj in page['Contents']:
                key = obj['Key']
                last_modified = obj['LastModified'].replace(tzinfo=timezone.utc)
                if last_modified < cutoff_date:
                    objects_to_delete.append({'Key': key})

    if len(objects_to_delete) > 0:
        s3.delete_objects(Bucket=bucket_name, Delete={'Objects': objects_to_delete})
        print(f'{len(objects_to_delete)} objects deleted.')
    else:
        print('No objects found to delete.')

def lambda_handler(event, context):
    bucket_name = 'devops-mind'
    prefix = 'tshoot-incidente-alb/AWSLogs/'
    days = 2

    delete_objects(bucket_name, prefix, days)
In this script, you only need to adjust the following fields:
After adjusting the code, there will be a message “Changes not deployed”, you can click on Deploy.

Before proceeding with using Lambda or configuring EventBridge, we need to adjust the permissions, both on the S3 Bucket and on the role that is used by Lambda.
For the whole process to work properly, permissions related to the S3 bucket are required.
Assuming you already have a bucket in S3 (I won’t cover the bucket creation part in this article), go to:
Let’s add the following policy:
{
    "Version": "2008-10-17",
    "Id": "Policy1335892530063",
    "Statement": [
        {
            "Sid": "DevOps-Mind-lambda",
            "Effect": "Allow",
            "Principal": {
                "Service": "lambda.us-east-1.amazonaws.com"
            },
            "Action": [
                "s3:*"
            ],
            "Resource": "arn:aws:s3:::devops-mind/tshoot-incidente-alb/AWSLogs/*",
            "Condition": {
                "StringEquals": {
                    "aws:SourceAccount": "123456"
                }
            }
        }
    ]
}
Edit the fields, according to the features and structure of your objects in S3.
It is also necessary to edit the SourceAccount, I tried to leave permissions for resources of a specific account only.
In actions we left them all, but we could release more specific actions. In order to make the article simpler, we will continue to allow all of them.
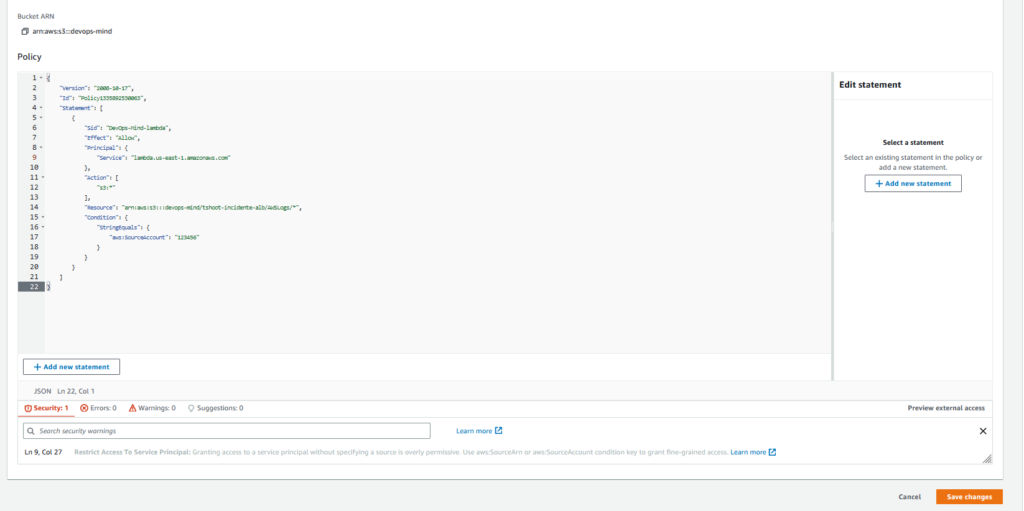
After finishing the adjustments in the policy, click on Save changes.
When we created Lambda, a Role was created along with it.
In my case the role is s3-lifecycle-role-fggxxkgz:

We need to create a policy and attach it to this role to ensure that it has the necessary privileges on our S3 bucket.
Access the IAM service on AWS, click on Policies and then on the Create policy button, as highlighted in yellow in the image below:
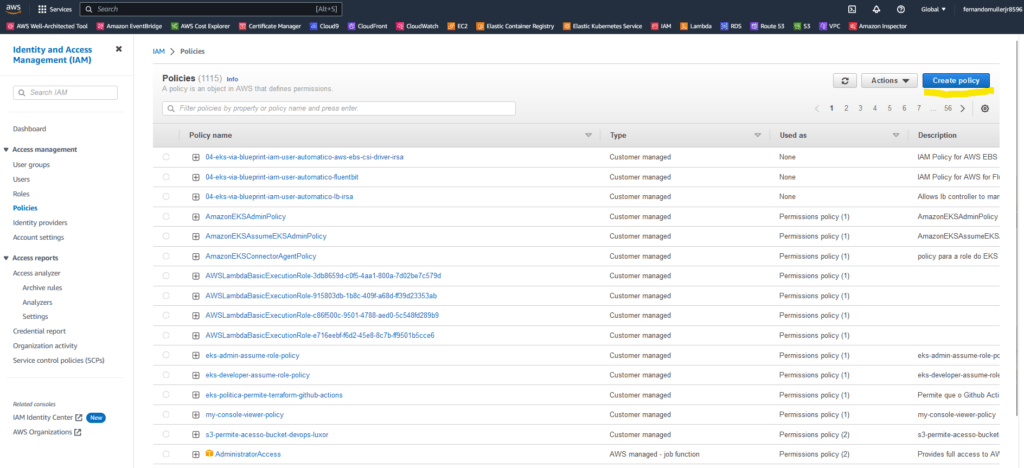
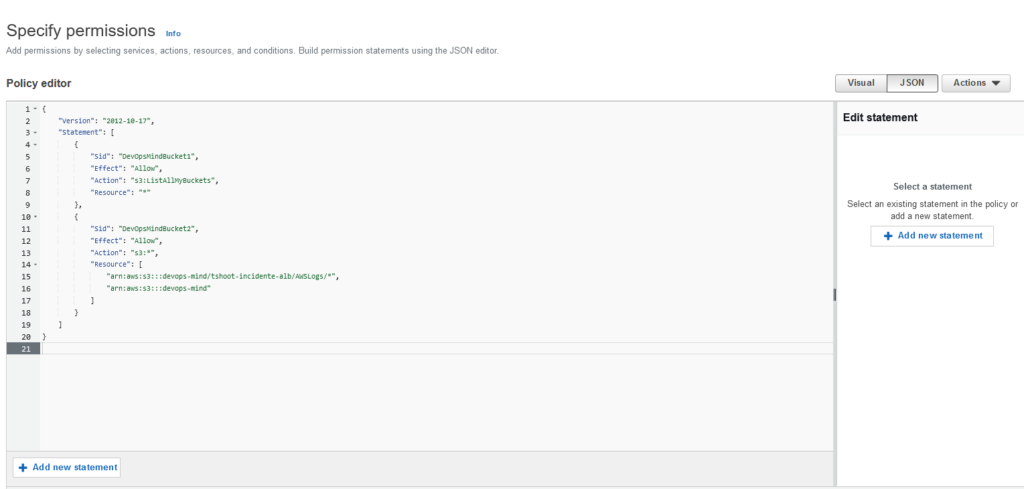
Let’s use the following code to create our policy:
{
    "Version": "2012-10-17",
    "Statement": [
        {
            "Sid": "DevOpsMindBucket1",
            "Effect": "Allow",
            "Action": "s3:ListAllMyBuckets",
            "Resource": "*"
        },
        {
            "Sid": "DevOpsMindBucket2",
            "Effect": "Allow",
            "Action": "s3:*",
            "Resource": [
                "arn:aws:s3:::devops-mind/tshoot-incidente-alb/AWSLogs/*",
                "arn:aws:s3:::devops-mind"
            ]
        }
    ]
}
Our screen will look like this:
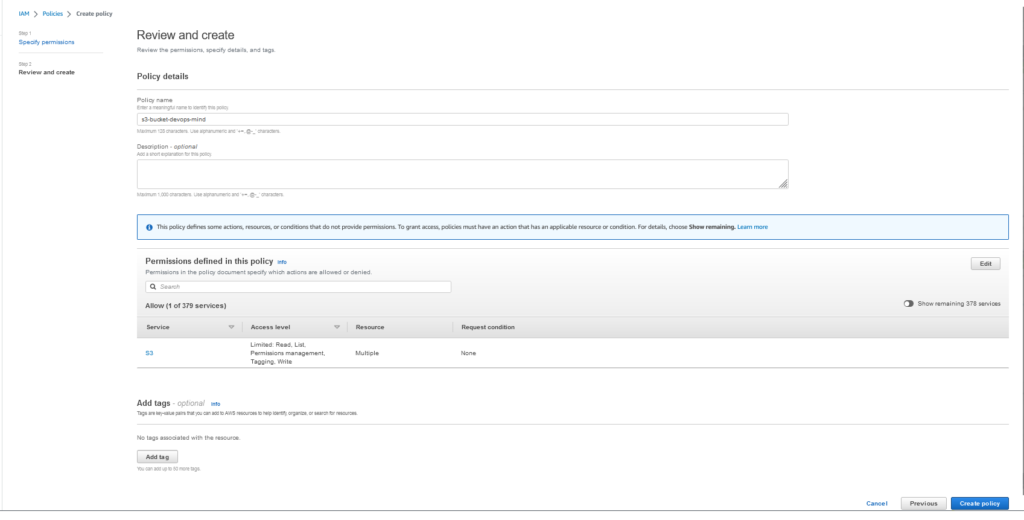
Define a name for the policy and click Create policy:
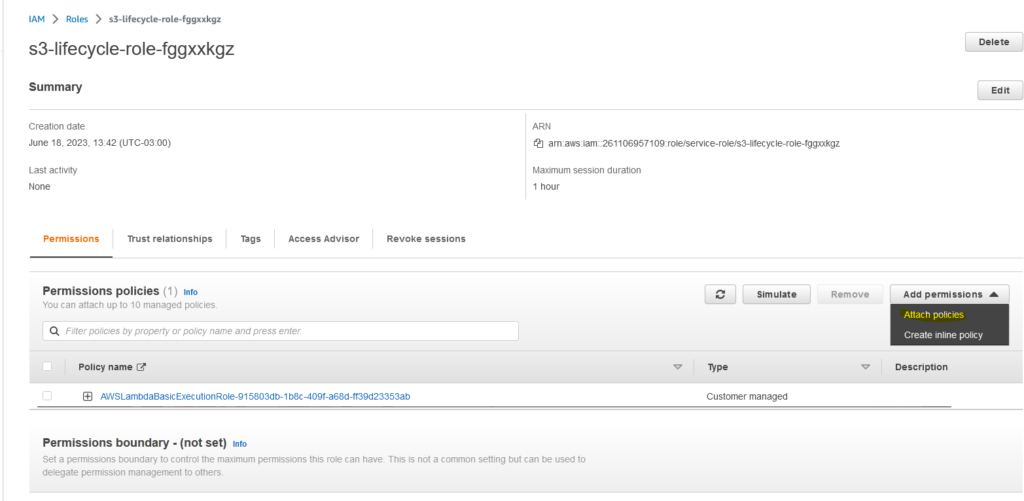
Once this is done, look for the role in IAM.

Go to Role and click on Add permissions.
After that, click on Attach policies:
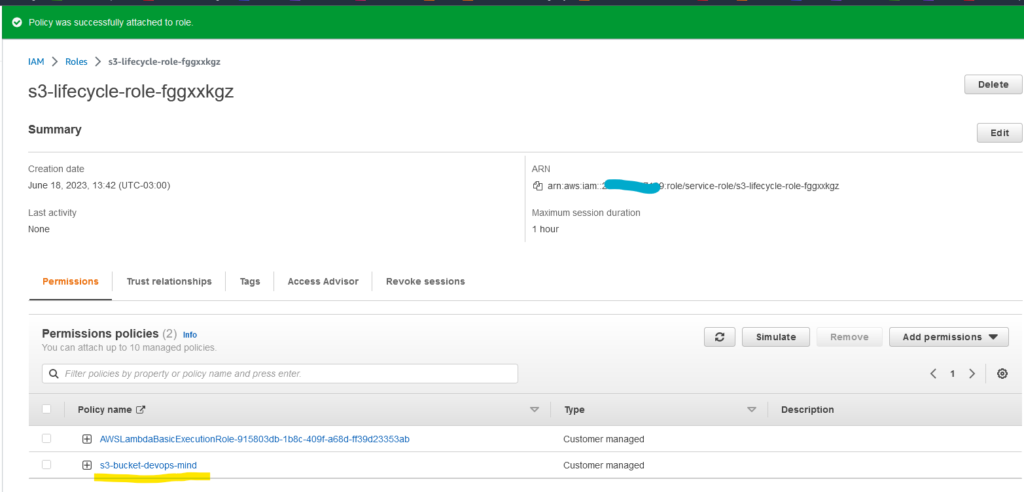
Select the policy in the search.
Click Add Permissions.

Expected outcome:
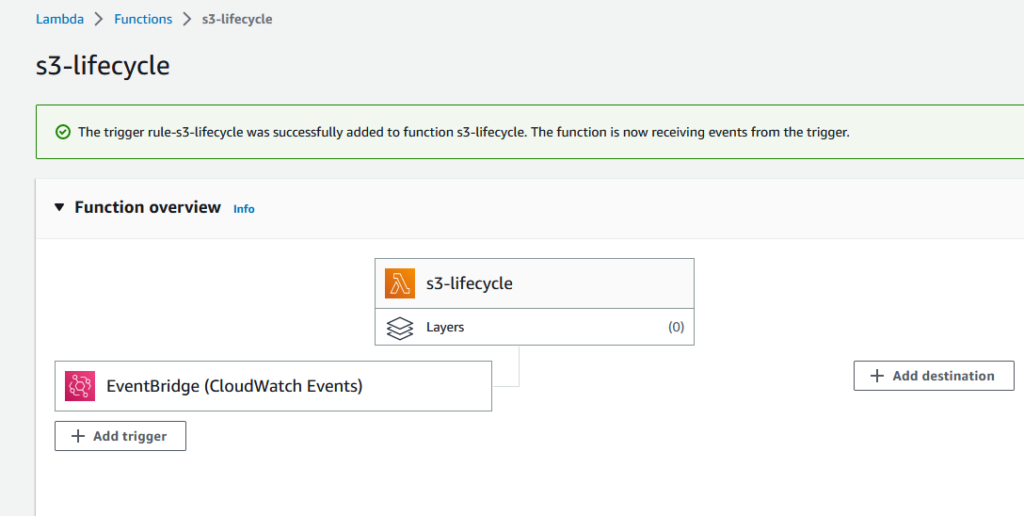
For the lifecycle process to occur as expected, we need to configure a trigger in our Lambda.
The easiest way is to go to the AWS console, access our Lambda again and click on Add trigger, as highlighted in yellow:

Configure the event source to use EventBridge.
Give the rule a name and add a description.
In Schedule expression, add the values:
cron(0 12 * * ? *)The cron expression cron(0 12 * * ? *) in an Amazon EventBridge rule defines an event schedule that occurs every day at 12:00 (noon) UTC.
Let’s analyze the cron expression in detail:
Therefore, the event rule with this cron expression will fire every day at exactly 12:00 (noon) UTC.
After configuring all the fields, we will have something like this:

Click on Add to finish the process.
Expected outcome:
When the S3 lifecycle doesn’t work properly, it can be frustrating to deal with unnecessary storage of objects or failure to delete expired items. Fortunately, by using AWS Lambdas, you can create a custom process to manage the lifecycle of objects in an automated and efficient way.
Through Lambdas, you can solve specific lifecycle issues in S3, ensuring that objects are correctly transitioned or deleted according to your business rules. In addition, Lambdas offer flexibility and scalability, allowing you to adapt the process to your changing needs.
By using AWS Lambdas to automate the S3 lifecycle process, you can keep your storage optimized and reduce unnecessary costs, Julius would certainly approve of these actions.
