Physical Address
304 North Cardinal St.
Dorchester Center, MA 02124
Accurate and precise timekeeping in Linux is of utmost importance in production servers for several critical reasons. First and foremost, many applications and services rely on precise time synchronization to function correctly, preventing failures and inconsistencies. Additionally, records and logs are often used for troubleshooting and performance analysis, and accurate time is essential for tracking events precisely.
In this scenario, observability plays a pivotal role. By embracing observability tools such as real-time monitoring and log analysis, system administrators can quickly identify any deviations in server time. Furthermore, alert systems can be configured to notify promptly about time-related issues.
Through observability, it’s possible to ensure that the server time remains synchronized, and in case of deviations, allow for a rapid response to correct the issue before it can have a negative impact on server operations and, consequently, the services provided to users.
Table of Contents
In the post below, I have explained the installation and operation of Chrony, which we will be using in this article:
Virtual machine instances that are part of Auto Scaling are typically created from pre-configured images. These images may include incorrect or outdated time settings. Additionally, the startup process can take some time, resulting in a time lag between the time configured in the image and the actual boot time.
When multiple instances are dynamically deployed and deactivated in response to system load, manually correcting the time on each instance can be a challenging and error-prone task. Time discrepancies among machines can lead to synchronization issues in distributed services, inconsistent logs, and difficulties in tracking events across the environment.
The dynamic nature of Auto Scaling machines presents significant challenges in terms of environment observability. As new instances are created and others are shut down, the infrastructure topology constantly changes. This can lead to issues in discovering and monitoring instances in real-time.
Another issue is the centralized collection of logs, metrics, and events from different instances that are continuously added and removed. Dealing with the variety of dynamically assigned IP addresses, identifiers, and other attributes to machines can make configuring an efficient monitoring system challenging.
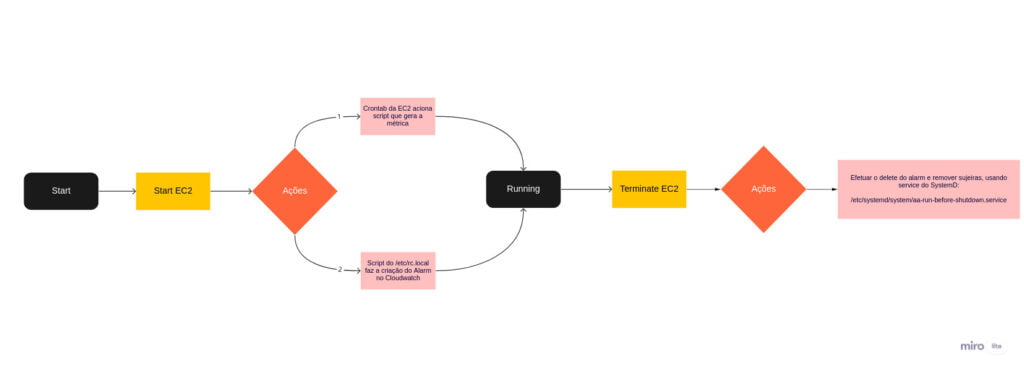
For the machines operating within the Auto Scaling group that require accurate timekeeping with utmost certainty, it was necessary to configure Chrony and establish a structure for alerting in case of any time discrepancies, based on dynamically generated metrics.
The structure is explained in the above image and can be summarized as follows:
This entire process is essential to ensure that alarms are created dynamically for each EC2 instance that spawns within the Auto Scaling group, preventing any clutter in CloudWatch.
The configurations demonstrated in this article are performed on a Linux server that serves as the basis for Auto Scaling. At the end of the process, it is recommended to create an Amazon Machine Image (AMI) and make the necessary configurations in the Launch Template and Auto Scaling. I will not detail these steps to keep the article from becoming too lengthy.
Additionally, we need an AWS SNS topic for sending emails through AWS CloudWatch alerts.
We need to create the alarm in CloudWatch every time the EC2 instance is launched. To do this, we’ll set up the /etc/rc.local file.
The /etc/rc.local file is a script file that runs during the Linux system’s boot process. However, the use of rc.local to start services or execute scripts can vary depending on the Linux distribution you are using. Starting from Debian 9 (Stretch) and newer systems, rc.local is disabled by default and requires some additional configurations to be used.
Edit the /etc/rc.local file and add the following content:
#!/bin/bash

INSTANCE_ID=`curl -s http://169.254.169.254/latest/meta-data/instance-id`

aws cloudwatch put-metric-alarm \
    --alarm-name "alerta-horario-ec2-$INSTANCE_ID" \
    --alarm-description "Alarme sobre problemas no horario da EC2 $INSTANCE_ID devido ClockErrorBound acima de 1ms" \
    --metric-name ClockErrorBound \
    --namespace TimeDrift \
    --statistic Average \
    --period 300 \
    --threshold 1 \
    --comparison-operator GreaterThanThreshold  \
    --dimensions "Name=Instance,Value=$INSTANCE_ID" \
    --evaluation-periods 3 \
    --datapoints-to-alarm 3 \
    --region sa-east-1 \
    --alarm-actions arn:aws:sns:sa-east-1:123456789:alertas-devops-mind
This script is a Bash shell script that creates a metric alarm in Amazon CloudWatch to monitor time drift on a specific EC2 instance.
Let’s break down each part of the script:
Therefore, this script creates a metric alarm in Amazon CloudWatch to monitor time drift (“ClockErrorBound”) on a specific EC2 instance and sends a notification to an SNS topic when the time drift exceeds 1 millisecond for three consecutive evaluation periods. This allows for the identification of time synchronization issues on the instance and the implementation of corrective actions in response to triggered alarms.
We also need to create a Shell Script that generates the metric based on the Chrony output.
The EC2 instance’s instance-id is obtained via the meta-data endpoint.
The value generated from Chrony is sent to AWS CloudWatch using the aws-cli.
Save the script at the path /devops/scripts/alerta-horario/timepublisher.sh with the following content:
#!/bin/bash

SYSTEM_TIME=""
ROOT_DELAY=""
ROOT_DISPERSION=""
INSTANCE_ID=`curl -s http://169.254.169.254/latest/meta-data/instance-id`

output=$(chronyc tracking)

while read -r line; do
# look for "System time", "Root delay", "Root dispersion".

 if [[ $line == "System time"* ]]
 then
 SYSTEM_TIME=`echo $line | cut -f2 -d":" | cut -f2 -d" "`
 elif [[ $line == "Root delay"* ]]
 then
 ROOT_DELAY=`echo $line | cut -f2 -d":" | cut -f2 -d" " `
 elif [[ $line == "Root dispersion"* ]]
 then
 ROOT_DISPERSION=`echo $line | cut -f2 -d":" | cut -f2 -d" " `
 fi
done <<< "$output"

CLOCK_ERROR_BOUND=`echo "($SYSTEM_TIME + (.5 * $ROOT_DELAY) + $ROOT_DISPERSION) * 1000" | bc `

# create or update a custom metric in CW.
aws cloudwatch put-metric-data \
    --metric-name ClockErrorBound \
    --dimensions Instance=$INSTANCE_ID \
    --namespace "TimeDrift" \
    --region sa-east-1 \
    --value $CLOCK_ERROR_BOUND
This Bash shell script aims to retrieve information about time drift from the EC2 instance on which it is executed and then send this value as a custom metric (ClockErrorBound) to Amazon CloudWatch.
Let’s break down step by step what the script does:
Therefore, this script gathers information about time drift from the EC2 instance using the Chrony client, calculates a clock error bound based on this information, and sends the resulting value as a custom metric to Amazon CloudWatch. This process can be useful for monitoring the accuracy of the instance’s time synchronization and taking corrective actions if the time drift exceeds the defined threshold.
To edit the crontab, you can use the crontab command. The crontab is the file that contains cron entries, and each user can have their own customized crontab. To edit the crontab for the current user, follow the steps below:
crontab -eTo adjust the crontab to use the script that creates a metric at a specific period, add the following content:
*/5 * * * * /devops/scripts/alerta-horario/timepublisher.sh >/dev/null 2>&1This line specifies that the script /devops/scripts/alerta-horario/timepublisher.sh will be executed every 5 minutes.
Let’s analyze the cron in detail:
*/5: The first field indicates the minutes when the script will be executed. */5 means “every 5 minutes.” In other words, the script will be executed when the minute is 0, 5, 10, 15, 20, 25, 30, 35, 40, 45, 50, or 55.
: The second field indicates the hours when the script will be executed. The asterisk () means that the script will be executed at all hours, regardless of the hour.
: The third field indicates the day of the month when the script will be executed. The asterisk () means that the script will be executed on all days of the month, regardless of the day.
: The fourth field indicates the month when the script will be executed. The asterisk () means that the script will be executed in all months, regardless of the month.
: The fifth field indicates the day of the week when the script will be executed. The asterisk () means that the script will be executed on all days of the week (from Sunday to Saturday), regardless of the day of the week.
/devops/scripts/alerta-horario/timepublisher.sh: This is the path to the timepublisher.sh script that will be executed.
/dev/null 2>&1: This part redirects the output (stdout and stderr) of the script to /dev/null, which is a special device in the Linux system that discards all data sent to it. This means that any output generated by the script will not be displayed on the terminal or stored in log files.In summary, this cron is used to schedule the execution of the timepublisher.sh script located in /devops/scripts/alerta-horario/ every 5 minutes. Any output generated by the script will be discarded and will not be displayed or logged.
We need to ensure the SystemD configuration on the EC2 instance, so that the alarm is deleted during termination to avoid clutter in AWS CloudWatch regarding dead EC2 instances from the ASG.
The path where the script should reside and run before termination:
/devops/scripts/alerta-horario/delete-alarm-alerta-horario.sh
Required Script:
#!/bin/bash

INSTANCE_ID=`curl -s http://169.254.169.254/latest/meta-data/instance-id`

aws cloudwatch delete-alarms \
    --region sa-east-1 \
    --alarm-names "alerta-horario-ec2-$INSTANCE_ID"
Path where the pre-terminate script should be configured:
/etc/systemd/system/aa-run-before-shutdown.service
The script should be executed during shutdown (pre-terminate):
[Unit]
Description=Deletar alarme
Requires=network-online.target
After=network.target

[Service]
Type=oneshot
RemainAfterExit=yes
ExecStop=/devops/scripts/alerta-horario/delete-alarm-alerta-horario.sh


[Install]
WantedBy=network.target
Here is an explanation of what each section of the file does:
In summary, the systemd service file “/etc/systemd/system/aa-run-before-shutdown.service” defines a systemd service that will run before the system shutdown. This service is of type “oneshot” and, after execution, will remain “active” even after it completes. The execution of the service involves running the script “delete-alarm-alerta-horario.sh” located in “/devops/scripts/alerta-horario/.”
In the scripts I provided, the region used was São Paulo (sa-east-1). Please remember to adjust it according to your environment.
For machines that are not part of an Auto Scaling Group (ASG), the procedure is simpler.
I hope the information presented here has been helpful and provided valuable insights into the importance of observability and monitoring time discrepancies in Linux using Chrony and AWS CloudWatch.

Proactive monitoring of EC2 instances is essential to ensure the stability and efficiency of your services in cloud environments. By detecting and alerting on potential time synchronization issues, we can take prompt action to prevent negative impacts on the systems.
AWS offers a variety of powerful tools for monitoring and managing cloud resources, and the combination of Chrony with AWS CloudWatch provides a reliable solution for addressing time discrepancies.
If you have any questions about the solution, please don’t hesitate to ask!