Physical Address
304 North Cardinal St.
Dorchester Center, MA 02124
Physical Address
304 North Cardinal St.
Dorchester Center, MA 02124


Granted is a command line interface (CLI) application that simplifies access to cloud functions and allows multiple cloud accounts(aws cli multiple accounts) to be opened in your web browser simultaneously and/or via terminal.

Granted’s objectives are:
Before continuing to write this article, I would like to show in a few images how simple it is to use Granted and how much it makes SRE’s life easier, because when speaking conceptually, it is not possible to immediately see how much this tool helps. day to day.
I will bring 2 examples, considering the use of Granted for the terminal context and for accessing AWS accounts in the Browser in separate tabs, without the need to log out/log in with each access.
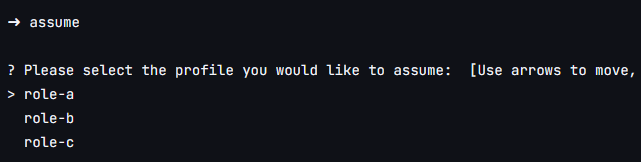
Run the assume command and choose the role that will be assumed:
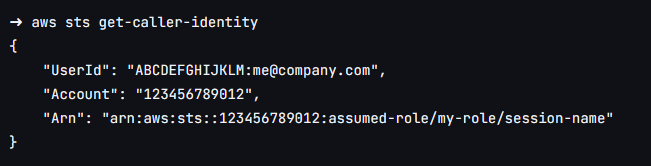
Message confirming that the role was successfully assumed:

From this, the commands executed in the terminal will be applied to the desired account. Running a command to confirm:
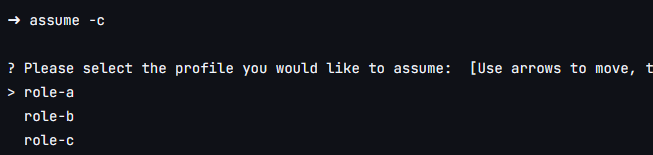
Just as we open an account and assume a role in the terminal context, we can use the command assume -c, it lists the roles that we can assume and opens a separate and colored tab in the desired AWS account, allowing us to work with several tabs, across multiple accounts, in a super simple way.
The first step is to run the command assume -c
After choosing the desired role/account, Granted will call the Browser and open the AWS page in the desired account:
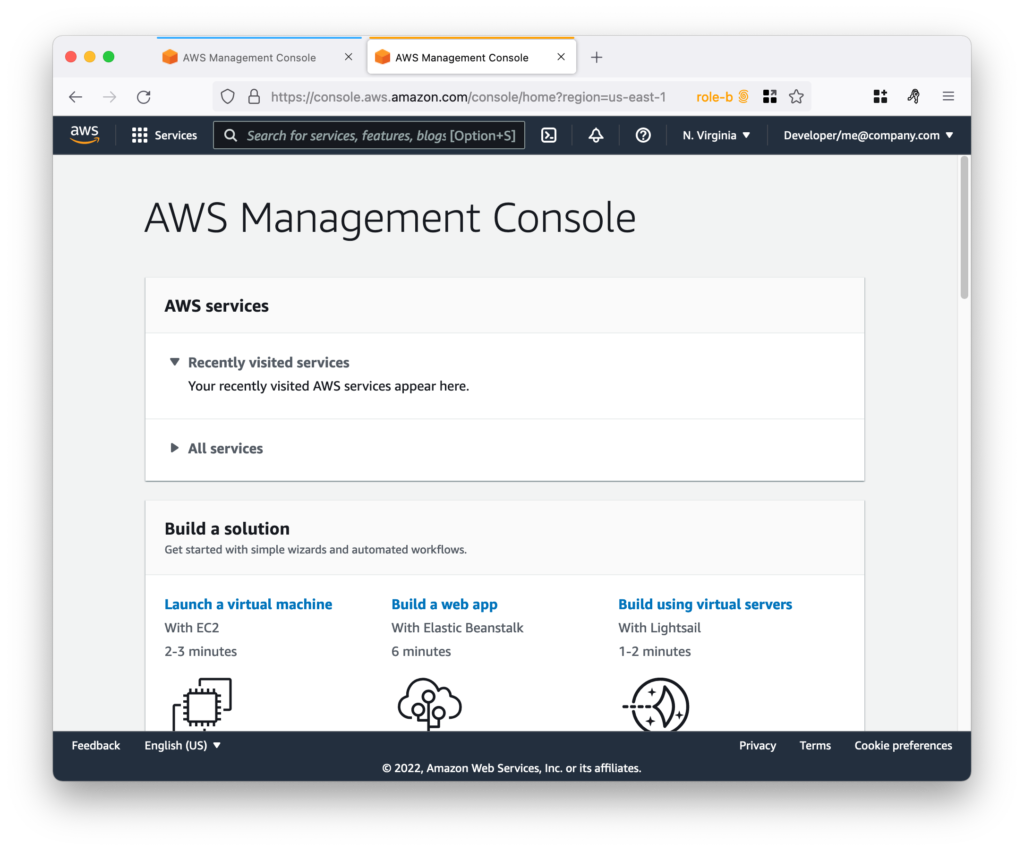
Each role assumed will adopt a different tab color in Firefox.
Granted supports MacOS, Linux and Windows. Windows support is less extensively tested than other platforms.
Granted currently supports access to roles in AWS. If you would like to see support for another cloud provider, please open an issue!
Granted currently supports Firefox, Chromium-based browsers (such as Chrome, Brave, and Edge), Safari, Arc, and Waterfox.
We recommend using Firefox with Granted as it offers the best user experience when accessing multiple cloud consoles, even if it’s not your daily driver browser. In Firefox, Granted uses multi-account containers to view multiple cloud accounts. Multiple cloud accounts can be opened in the same window and are color-coded for easy reference.
To use Granted with Firefox, you will need to download the Firefox add-on. The extension requires minimal permissions and does not have access to web page content. You can read more about security considerations for the extension here. In Chromium-based browsers, Granted uses profiles. Each cloud account opens in a separate window.
In the cloud computing domain, adopting best practices often leads cloud professionals to adopt multi-account environments. However, managing and navigating resources across multiple accounts can present challenges, especially when cross-referencing or monitoring logs. The AWS console, a valuable tool for viewing cloud resources, can become cumbersome in these scenarios, allowing access to only one account and region at a time, per browser session.
Recognizing this pain point, the development of Granted emerged as a solution to enhance the multi-account cloud experience. Instead of abandoning the native console and opting for custom abstractions, Granted recognizes the usefulness of the console and aims to make it a more effective tool for cloud professionals.
One of the driving factors behind the creation of Granted was the differentiated handling of session credentials by the AWS CLI when using AWS SSO (Single Sign-On). Although AWS SSO eliminates the need for long-running IAM credentials, the AWS CLI stores the SSO access token in plain text, posing a potential security risk. In contrast, Granted offers a notable improvement in this aspect. It securely stores the SSO access token in system keychain rather than on disk, providing an additional layer of protection and ease of revoking the token in the event of compromise.
At the company Common Fate, Granted was integrated into daily cloud access routines, where they achieved a significant increase in productivity. By simplifying resource management across multiple accounts and addressing security concerns related to SSO access tokens, Granted has proven to be a valuable asset for cloud operations.
Granted stands out as a tool designed to empower cloud professionals in multi-account environments. Its emphasis on improving the native console experience and enhancing security features, especially in the context of AWS SSO, makes it a notable choice for those looking to optimize their cloud workflows without sacrificing convenience or security. Elevate your cloud experience with Granted and unlock new levels of efficiency and confidence in managing your cloud resources.
The best way to take advantage and use granted is to install it via asdf.
If you have never used asdf, here is support material: https://asdf-vm.com/guide/getting-started.html
asdf install granted latest
asdf global granted 0.20.6  # ⬇️

# latest version at the time this manual is written,
# adjust to your version after install with latest

# adjust the alias for assume
## bash/zsh
echo "alias assume='source \$(asdf which assume)'"|tee -a ~/.zshrc ~/.bashrc

## fish
echo "alias assume='source (asdf which assume).fish'"|tee -a ~/.config/fish/config.fishAfter installing granted using asdf you should have received a message to add an alias for a utility called assume. To set the same:
# create the directory for the aws config if it doesn't already exist
mkdir -p ~/.aws

# makes a backup if the file already exists
[ -f ~/.aws/config ] && mv ~/.aws/config ~/.aws/config.bkp.$(date '+%Y%m%d')
touch ~/.aws/config

# generate the ~/.aws/config file with the existing SSO credentials
granted sso populate --sso-region us-east-1 https://devopsmind.awsapps.com/start#/

# Your browser window will open to authenticate to AWS
# Provide credentials and click Allow to authorize
# and the file ~/.aws/config# will be created[profile Fernando-teste/...][profile devops-mind-producao/...]region = sa-east-1assume without any parameters, AFTER the initial setup, you will be offered to choose which profile to use.
assume – in the terminalubuntu@devops-mind:~$ assume
? Please select the profile you would like to assume: Fernando-Teste/Administrator
[i] To assume this profile again later without needing to select it, run this command:
> assume Fernando-Teste/Administrator
[i] If the browser does not open automatically, please open this link: https://device.sso.us-east-1.amazonaws.com/?user_code=PSBX-RTFW
[i] Awaiting AWS authentication in the browser
[i] You will be prompted to authenticate with AWS in the browser, then you will be prompted to 'Allow'
[i] Code: PSBX-RTFW
[✔] [Fernando-Teste/Administrator](sa-east-1) session credentials will expire in 12 hours
ubuntu@devops-mind:~/Downloads/test-asdf$ aws eks list-clusters
{
    "clusters": [
        "eks-producao"
    ]
}~/.kube/configubuntu@devops-mind:~/Downloads/test-asdf$ assume Fernando-Teste/Administrator
ubuntu@devops-mind:~/Downloads/test-asdf$ aws eks --region us-east-1 update-kubeconfig --name eks-producao --alias eks-producao
[✔] [Fernando-Teste/Administrator](sa-east-1) session credentials will expire in 12 hours
Added new context eks-producao to /home/ubuntu/.kube/config
ubuntu@devops-mind:~/Downloads/test-asdf$ kubectl get nodes
NAME STATUS ROLES AGE VERSION
ip-172-28-0-56.ec2.internal Ready <none> 47h v1.21.14-eks-48e63af
ip-172-28-31-112.ec2.internal Ready <none> 2d4h v1.21.14-eks-48e63af
ip-172-28-46-176.ec2.internal Ready <none> 2d4h v1.21.14-eks-48e63af
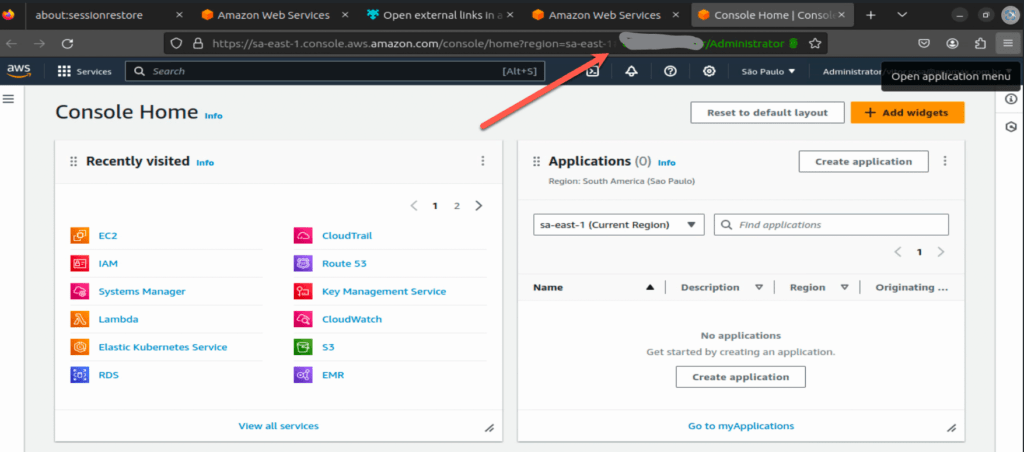
assume – in the browser (console)Fernando-Teste/Administrator account:ubuntu@devops-mind:~/Downloads/test-asdf$ assume -c Fernando-Teste/Administrator
[i] use -s to open a specific service ( https://docs.commonfate.io/granted/usage/console )
[i] Opening a console for Fernando-Teste/Administrator in your browser...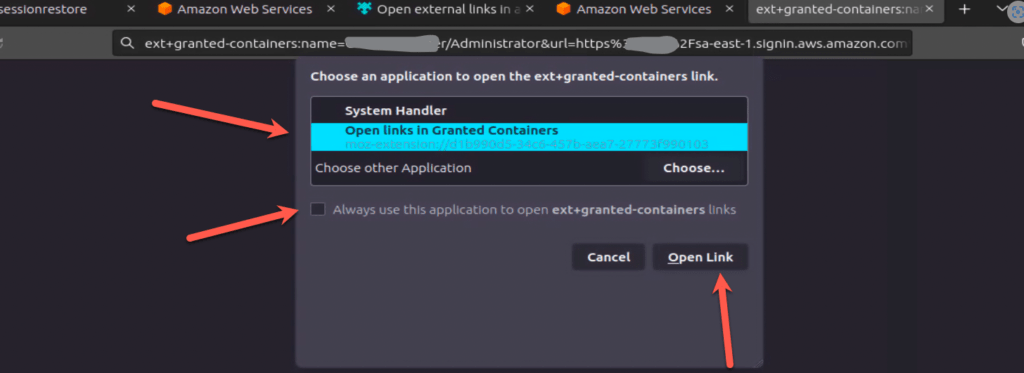
devops-mind-producao/Administrator account directly in the RDS serviceubuntu@devops-mind:~/Downloads/test-asdf$ assume -c devops-mind-producao/Administrator -s rds
[i] Opening a console for devops-mind-producao/Administrator in your browser...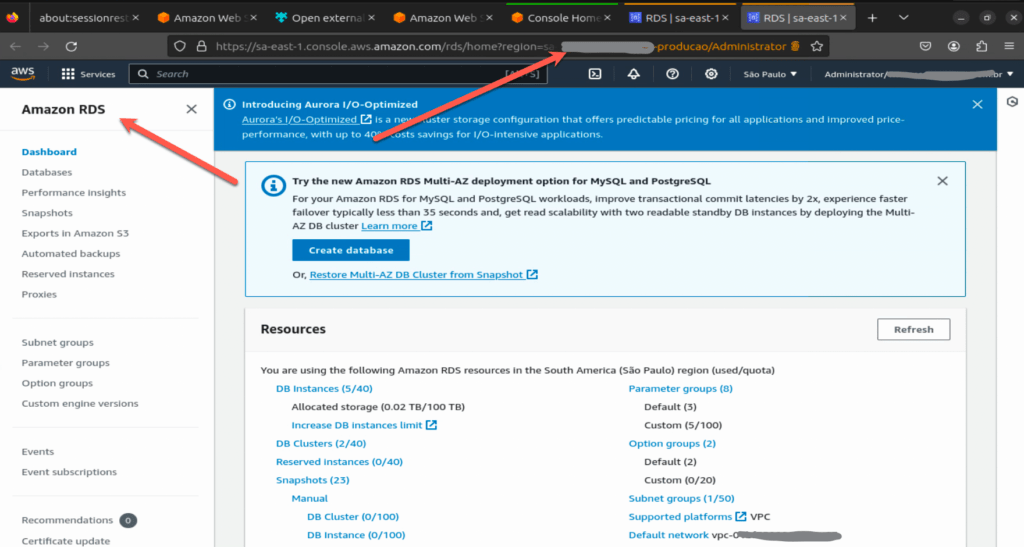
With this, we can open different tabs, in different accounts, without the need to switch between accounts in a more time-consuming way.
More tips:
https://devopsmind.com.br/en/category/cloud-en
In this example below I bring a case where a Granted installation had problems on a MacOS machine.
When executing the assume command, it displays the message to configure the alias, instead of the command being executed normally.
Verified that there is an alias in the .zshenv file:
░▒▓ ✔ 10:25:32 ▓▒░
░▒▓ ~ ▓▒░ assume ░▒▓ ✔ 10:25:32 ▓▒░
[i] To assume roles with Granted, we need to add an alias to your shell profile (https://docs.commonfate.io/granted/internals/shell-alias)
? Install zsh alias at /Users/fernando/.zshenv Yes
[✔] Added the Granted alias to /Users/fernando/.zshenv
[!] Shell restart required to apply changes: please open a new terminal window and re-run your command.
░▒▓ ~ ▓▒░ tail /Users/fernando/.zshenv ░▒▓ ✔ 15s 10:25:48 ▓▒░
alias assume=". assume"
░▒▓ ~ ▓▒░ ░▒▓ ✔ 10:25:56 ▓▒░
░▒▓ ~ ▓▒░It is necessary to modify the .zshenv file, commenting the alias line.
Leave the alias only in ~/.zshrc
░▒▓ ✔ 10:31:16 ▓▒░
░▒▓ ~ ▓▒░ tail ~/.zshrc ░▒▓ ✔ 10:31:16 ▓▒░
# For a full list of active aliases, run `alias`.
#
# Example aliases
# alias zshconfig="mate ~/.zshrc"
# alias ohmyzsh="mate ~/.oh-my-zsh"
# To customize prompt, run `p10k configure` or edit ~/.p10k.zsh.
[[ ! -f ~/.p10k.zsh ]] || source ~/.p10k.zsh
. /opt/homebrew/opt/asdf/libexec/asdf.sh
alias assume='source $(asdf which assume)'
░▒▓ ~ ▓▒░