DevOps Mind
Docker Multistage Build: Construa imagens leves e seguras
Ao trabalhar com containers Docker, otimizar imagens é algo super importante para melhorar a performance e reduzir custos. É aqui que o Docker Build com Multistage se destaca, permitindo a criação de imagens mais leves e seguras. Essa técnica, uma das melhores práticas no desenvolvimento com Docker, simplifica a construção e entrega de aplicações em ambientes modernos.
Neste artigo, vamos entender como o Docker Build com Multistage pode ajudar no dia a dia, reduzindo o tamanho das imagens e promovendo maior eficiência no processo de docker build. Entenderemos os benefícios, exemplos práticos e como implementá-lo corretamente.
Tópicos
O que é Docker Multistage Build?
O Docker Multistage é uma funcionalidade que permite usar múltiplos estágios no processo de build, separando ambientes de compilação e execução. Isso permite que os times construam imagens Docker mais eficientes e otimizadas, reduzindo o tempo de build e melhorando a eficiência do processo.
Esta abordagem, introduzida no Docker 17.05, revolucionou a criação de containers eficientes.
Benefícios do Multistage Build
- Redução significativa do tamanho final da imagem
- Separação clara entre dependências de desenvolvimento e produção
- Melhor segurança por não incluir ferramentas de compilação no container final
- Simplificação do processo de docker build
- Otimização do cache de camadas
Como funciona o Docker Multistage Build?
O funcionamento baseia-se em múltiplas instruções FROM dentro do mesmo arquivo Dockerfile. Cada FROM inicia um novo estágio de construção. Você pode copiar artefatos de um estágio para o próximo usando COPY --from.
Exemplo básico de Docker Multistage Build
Aqui está um exemplo simples que demonstra o uso em uma aplicação Go:
# Estágio 1: Build
FROM golang:1.20 AS build
WORKDIR /app
COPY . .
RUN go build -o main .

# Estágio 2: Produção
FROM alpine:3.18
WORKDIR /root/
COPY --from=build /app/main .
ENTRYPOINT ["./main"]
O que está acontecendo aqui?
- No primeiro estágio, compilamos o código com todas as dependências.
- No segundo estágio, usamos uma imagem leve (Alpine) e copiamos apenas o executável necessário.
Essa abordagem elimina ferramentas e dependências do estágio de build, resultando em uma imagem final extremamente leve.
Build tradicional
No método de build tradicional para criar imagem Docker, são normalmente utilizadas imagens padrão da linguagem, fabricante, etc, sendo imagens contendo diversos elementos extras que são às vezes desnecessárias, gerando uma imagem final muito pesada.
Para exemplificar, eu trago uma aplicação que eu tenho neste repositório pessoal:
Trata-se de uma aplicação em NodeJS, que foi criada para atender a um Desafio Docker do curso KubeDev(atual formação DevOps Pro).
O Dockerfile normal sem aplicar o Multistage está disponível no repositório, de qualquer forma, segue abaixo o código dele:
FROM node:14.17.5
WORKDIR /app
COPY package*.json ./
RUN npm install
COPY . .
EXPOSE 8080
CMD ["node", "server.js"]
É um Dockerfile onde utiliza a imagem oficial do node e executa mais algumas etapas necessárias para o build acontecer. Temos apenas 1 instrução FROM para o arquivo inteiro e não existem divisões.
Para efetuar o build localmente, eu acesso a pasta src e executo o comando abaixo:
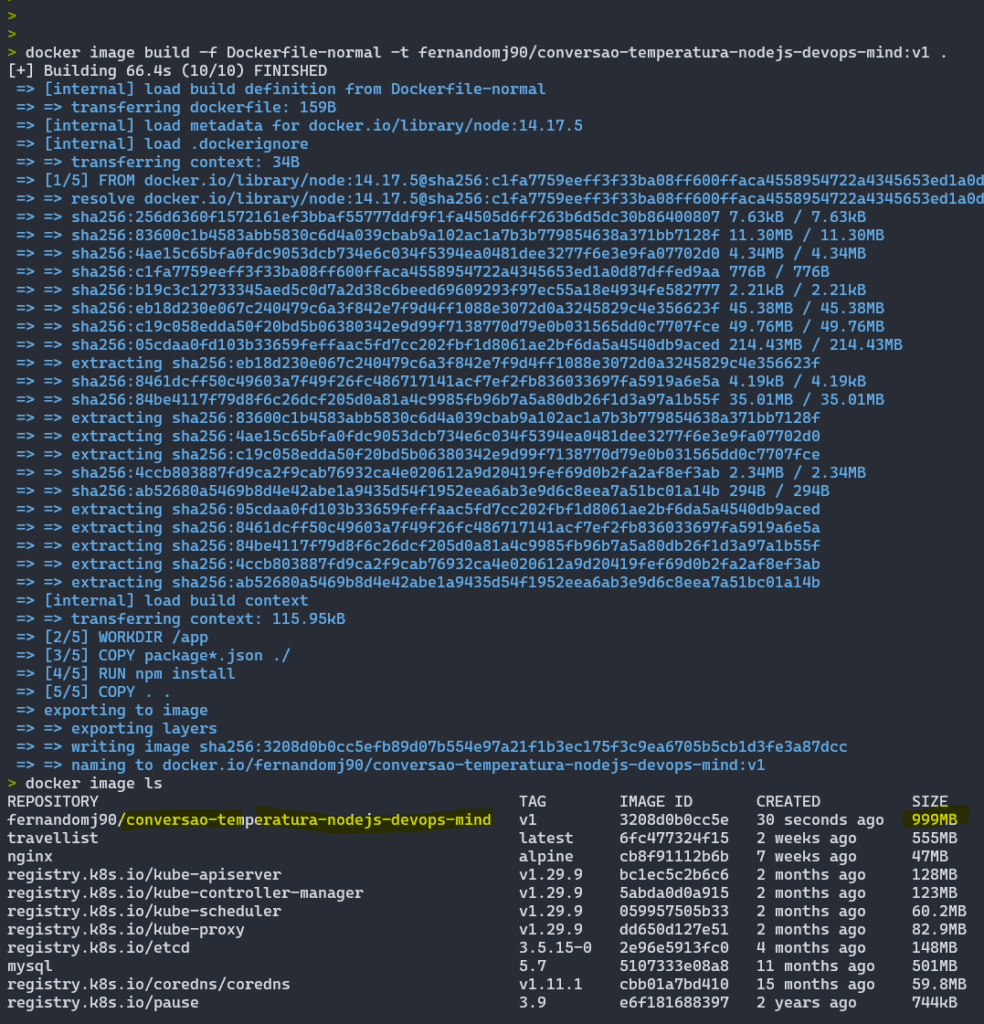
docker image build -f Dockerfile-normal -t fernandomj90/conversao-temperatura-nodejs-devops-mind:v1 .Então é iniciado o build e gerada a imagem Docker final:

Como podem ver, é gerada uma imagem de 999MB, que é algo bem pesado para ser gerado, então acaba sendo demorado o processo local ou numa pipeline, além de demandar mais espaço de armazenamento, seja na nuvem ou local, dependendo da escolha. Dito isto, temos uma imagem que não é interessante pelos fatores de performance e custo, sendo 2 pontos mega relevantes atualmente, visto que cada vez mais os custos são um assunto que vem a mesa quando estamos trabalhando com Cloud.
Implementando Docker Multistage
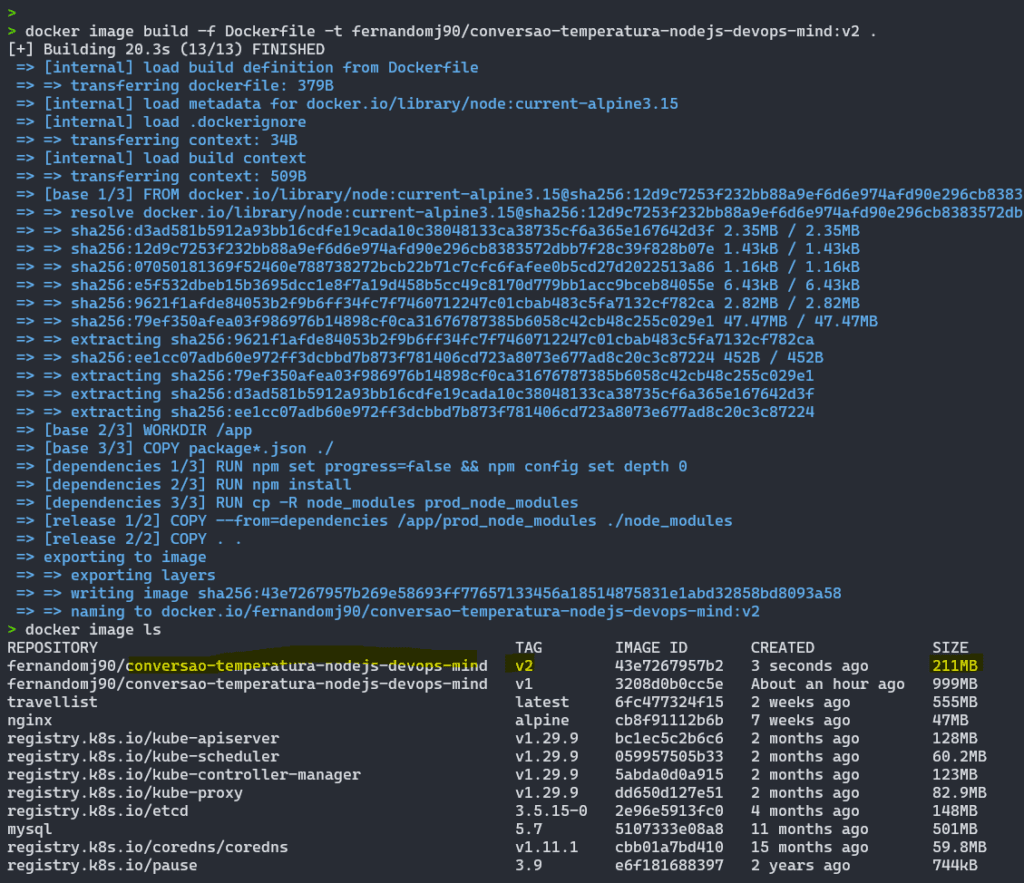
Ao implementar as boas práticas do Docker multistage build, a diferença no tamanho final da imagem é enorme, utilizando o projeto mencionei acima, chegamos numa imagem que pesa apenas 211MB, além de termos menos camadas criadas durante o processo e uma maior segurança num geral:

Dependendo da estrutura do projeto, imagem base e outras abordagens, é possível chegar a imagens pesando menos de 100MB, por exemplo. Ao utilizar o Multistage é possível efetuar otimizações adicionais e alcançar uma imagem de apenas 34MB com todo o projeto e estrutura necessária para a aplicação ser executada com sucesso.
Estrutura de um Dockerfile Multistage
FROM node:current-alpine3.15 AS base
WORKDIR /app
COPY package*.json ./

FROM base AS dependencies
RUN npm set progress=false && npm config set depth 0
RUN npm install
RUN cp -R node_modules prod_node_modules

FROM base AS release
COPY --from=dependencies /app/prod_node_modules ./node_modules
COPY . .
EXPOSE 8080
CMD ["node", "server.js"]
Neste Docker build, temos um aplicativo Node.js simples que será executado em uma imagem Alpine Linux. O Dockerfile será dividido em três etapas: a etapa de base, a etapa de dependências e a etapa de lançamento. Cada etapa terá seus próprios comandos de construção e imagens base.
Todas elas tem algo em comum: o uso da instrução FROM no começo de cada estágio.
Cada estágio cumpre uma função específica: configurar o ambiente base, otimizar dependências e construir a imagem final, resultando em um container leve, eficiente e seguro.
Anatomia do Dockerfile Multistage para Node.js
Estágio base
FROM node:current-alpine3.15 AS base
WORKDIR /app
COPY package*.json ./
Este primeiro estágio, chamado “base”, estabelece os fundamentos da nossa imagem. O Alpine Linux, conhecido por sua leveza, é a escolha ideal para containers docker conforme recomendado pela documentação oficial do Node.js.
Neste estágio base é definido o diretório de trabalho como /app. Em seguida, copia os arquivos package*.json para o diretório de trabalho.
Reaproveitamento de camadas: O uso de um estágio base garante eficiência ao reutilizar camadas comuns.
Estágio de dependências
FROM base AS dependencies
RUN npm set progress=false && npm config set depth 0
RUN npm install
RUN cp -R node_modules prod_node_modules
A etapa de dependências é responsável por instalar as dependências do aplicativo. No caso de uso em questão, utilizamos a imagem base como base e instalamos as dependências utilizando o comando npm install. Além disso, copiamos o diretório node_modules para o diretório prod_node_modules para ser utilizado na etapa de lançamento.
Dica:
Certifique-se de que o arquivopackage.jsonestá configurado corretamente com as dependências categorizadas emdependenciesedevDependencies. Isso garante que a instalação seja adequada para produção.
Etapa de lançamento
FROM base AS release
COPY --from=dependencies /app/prod_node_modules ./node_modules
COPY . .
EXPOSE 8080
CMD ["node", "server.js"]
A etapa de lançamento é responsável por definir as configurações de lançamento do aplicativo. Neste caso, utilizamos a imagem base como base, copiamos as dependências instaladas na etapa de dependências e definimos a porta de exposição como 8080. Por fim, definimos o comando de inicialização do aplicativo como node server.js.
Dica:
Se a aplicação incluir arquivos estáticos (ex.: assets ou builds), certifique-se de copiá-los no estágio final.
Benefícios do Multistage Build neste Dockerfile
| Benefício | Como é alcançado? |
|---|---|
| Redução de tamanho | Apenas os arquivos e dependências necessários estão na imagem final. |
| Segurança | Dependências de desenvolvimento e ferramentas de build não estão incluídas. |
| Performance no Build | O uso do estágio base aproveita camadas de cache para builds futuros. |
| Manutenção facilitada | Separação de responsabilidades entre os estágios. |
O Dockerfile em questão é um exemplo de como utilizar as boas práticas no Docker para um caso de uso específico: um aplicativo Node.js rodando em uma imagem Docker com Alpine Linux. Dividindo o processo de construção em etapas, é possível ter um Dockerfile mais organizado e fácil de ler, além de reduzir o tamanho da imagem Docker final e aumentar a segurança do aplicativo.
Melhores práticas no uso de Multistage Build
1. Use imagens base otimizadas
Escolha imagens base minimalistas para o estágio de produção, como Alpine Linux. Isso reduz o tamanho da imagem final. Também existe a opção de imagens slim, que são uma versão mais enxuta de distribuições conhecidas, mas sem ter uma estrutura tão “crua” como o Alpine.
2. Remova arquivos temporários
Certifique-se de excluir caches e arquivos temporários ao longo do processo de build para evitar resíduos desnecessários para nossa aplicação.
3. Combine instruções sempre que possível
Agrupe comandos em uma única instrução RUN para minimizar camadas desnecessárias. Exemplo:
RUN apt-get update && apt-get install -y \
    curl \
    && rm -rf /var/lib/apt/lists/*
Criar imagens Docker de forma adequada exige esforço e atenção, mas o resultado final traz grandes benefícios para a velocidade e segurança na entrega de suas aplicações. Imagens maiores frequentemente possuem um número elevado de vulnerabilidades de segurança, o que não deve ser ignorado em nome da agilidade. A realidade é que imagens bem feitas requerem cuidado e dedicação.
Embora não sejam uma solução infalível, os Docker Multistage Build facilitaram bastante a criação de imagens otimizadas, tornando mais simples e seguro utilizá-las em ambientes de produção.
FAQs
P: O docker multistage afeta o desempenho do build?
R: Não significativamente. O processo pode ser até mais rápido devido à otimização de camadas.
P: Posso usar mais de dois estágios?
R: Sim, é possível usar múltiplos estágios conforme necessário.
P: Como debugar builds multistage?
R: Utilize o comando docker build --target <stage> para construir estágios específicos.
P: Por que usar Alpine ao invés de outras imagens base?
R: O Alpine Linux oferece uma imagem base extremamente leve (cerca de 5MB), ideal para docker multistage em produção.
P: Qual a função do estágio ‘dependencies’?
R: Este estágio isola o processo de instalação de dependências, garantindo que apenas módulos necessários sejam copiados para o container final.
P: Como posso reduzir ainda mais o tamanho da imagem?
R: Considere usar Docker layer caching e remover arquivos temporários em uma única camada.
P: Por que usar o Multistage Build em projetos Node.js?
R: Ele ajuda a criar imagens menores e mais seguras, separando dependências de produção e desenvolvimento. Isso reduz o risco de expor informações ou arquivos desnecessários.
Agora que você já sabe como otimizar suas imagens Docker, que tal subir o seu cluster Kubernetes via Terraform de forma fácil? Confira nosso post sobre como criar um cluster EKS via Terraform usando AWS Blueprint: https://devopsmind.com.br/aws-pt-br/como-criar-cluster-eks/


